
So, first things first, what the hell is an IoT Dev Kit/MXChip?

Well, it’s a small prototype development board with an arduino microcontroller built-in. While it’s easy to compare something that looks like this to a Raspberry Pi, but that would be a bit of a misconception. The Pi is a small single board computer, with a display output, an ARM CPU and it runs a full operating system. This little dude is basically an arduino, a programmable microcontroller with a bunch of sensors, buttons and outputs attached, saves you soldering away or connecting a bread board. A microcontroller runs one bit of software, all the time. Typically something running on a loop, forever until it is powered down.
This particular one is made by a company called MXChip, with a particular spec that is backed by Microsoft for working with their Azure cloud platform. It has some hardware based security built-in to protect keys etc. Azure has a cloud component called the “IoT Hub” which is aimed at provisioning and managing your IoT devices securely. It has a small screen, a temperature/humidity sensor, a magnetic sensor, wi-fi connectivity, two buttons, an accelerometer, a microphone and a headphone jack.
All that being said, it’s a great fun little board to play with and lots of resources and beginner projects are available for them.
You can get them from the manufacturer’s website, resellers, or just old faithful amazon for about £40.
https://www.amazon.co.uk/Plugable-Integrated-Microsoft-Arduino-Software/dp/B07646QWN9
You can find a detailed schematic here… if you understand that sort of thing.
Displaying sensor data using dotnet core tools
(Warning, this assumes you have a basic knowledge of C# and Azure.. you could probably muddle through if you don’t have those skills, but I’m not going to baby you, I’m not your momma)

1 – Get the MXChip up and running using the Microsoft Quick Start
So.. all that being said, lets get started. First thing to do is to get the MXChip up and running and transmitting the data we want to process. Microsoft have produced a great tutorial here and I would recommend you work through that.
NB: I did have one small issue with the tutorial, on steps 6/7 when you are getting/setting a connection string, mine didn’t seem to work, so when I got to the end it said “IoT Hubname is not found” so I went into Azure, went to my hub and my device, then copied the device connection string (not the hub) and manually set it using the steps mentioned in the steps. You need to put your device into the “Configuration mode” they talk about, then click F1 > Azure IoT Device Workbench: Configure Device Settings > Config Device Connection String then manually paste in the connection string. This worked for me, and when I restarted the device, it was sending data fine.
Once you have the code running on your MXChip and you are seeing the messages in your output window, you are golden, you can unplug the chip for now. As mentioned above, a microcontroller only runs one bit of software on a loop, so as soon as you power that little guy back up it will start running your software again, it doesn’t need to be connected to the computer if you would rather just plug it into a battery pack or old phone charger.

2 – Getting Setup in Azure
Note: All the code for this project can be found on my public GitHub HERE
Now that your chip is sending data up to the Azure IoT Hub, we want to process it. One of the most useful bits of computing in Azure is a webjob.. it’s basically a console app that runs on the small VM that a webapp would run on (you can run it beside an existing website, and run many webjobs on the one webapp). Also they are super easy to run locally like I did here, as they are basically just dotnet core console apps.
NB: I should note that while scalable, webjobs might not be the best suited for massive amounts of IoT devices with unpredictable ingress volumes. More actively scalable things like Azure Functions might suit that sort of thing well.
When you setup your chip using the Microsoft Tutorial, you will have created an Azure IoT Hub, the cool thing about these is that they expose an endpoint that’s compatible with the Microsoft Event Hub architecture. So that anything that can subscribe to the Event Hub to process messages, can receive messages from your IoT devices. You can grab the connection details by clicking on the “Built in Endpoints” tab in the Azure Portal. You are going to want to copy down the “event hub name” and “event hub connection string” from here.

If you grab the Webjob from my repo above that’s the best way to get everything right, but I will give you a quick rundown of the best bits.
Add a new storage account to your azure resource group as well, and save the connection string from here. (Create a storage account, then go to Access Keys on the left menu from within the storage account) this will be used to store checkpoints and logs from the webjob.
While you are in Azure you should add a new SQL Database too (we will use this later) I scaled mine down to “Basic” for something as small as this so it cost less than £5 a month to run. You could also use SQLite on your local machine as well if you wanted (Just replace the .UseSqlServer with .UseSqlLite in the setup files, and add the entity framework SQL Lite package instead of the SQL Server one). While you are in azure grab the SQL Connection strings from your SQL Server.
3 – Creating the WebJob
I created this project with a “dotnet new console” and just built the rest of the code around it. Basically this will be an “always-on” application that just runs monitoring the EventHub endpoint that our IoT Hub provides us. Reads the incoming messages, processes them, then updates values in a database. First thing first is to edit the .csproj file and add the packages that you need to the project. So copy and paste this into your .csproj
Exe
netcoreapp2.2


<PackageReferenceInclude="Microsoft.Azure.ServiceBus"Version="3.3.0"/>
<PackageReferenceInclude="Microsoft.Azure.WebJobs.Core"Version="3.0.0-beta5"/>
<PackageReferenceInclude="Microsoft.Azure.WebJobs.Extensions"Version="3.0.0-beta5"/>
<PackageReferenceInclude="Microsoft.Azure.WebJobs.Extensions.EventHubs"Version="3.0.0-beta5"/>
<PackageReferenceInclude="Microsoft.Azure.WebJobs.ServiceBus"Version="3.0.0-beta5"/>
<PackageReferenceInclude="Microsoft.Extensions.Configuration"Version="2.2.0"/>
<PackageReferenceInclude="Microsoft.Extensions.Configuration.Json"Version="2.2.0"/>
<PackageReferenceInclude="Microsoft.Extensions.DependencyInjection"Version="2.2.0"/>
<PackageReferenceInclude="Microsoft.Extensions.Options.ConfigurationExtensions"Version="2.2.0"/>
<PackageReferenceInclude="Microsoft.Extensions.Configuration.AzureKeyVault"Version="2.2.0"/>
<PackageReferenceInclude="WindowsAzure.Storage"Version="9.3.1"/>
<PackageReferenceInclude="Microsoft.EntityFrameworkCore.SqlServer"Version="2.2.0"/>


<ContentInclude="appsettings*.json"CopyToOutputDirectory="PreserveNewest"/>
Here we are adding support for Webjobs, EventHubs and EntityFramework.. that gives us the basis for connecting to the EventHub, processing the data, and saving it to a database.

So now we need to setup our application to listen to an event hub and process the events. (Once more, this is a quick run through of the code, for the full solution, check the repo above… last time I will remind you, I promise)
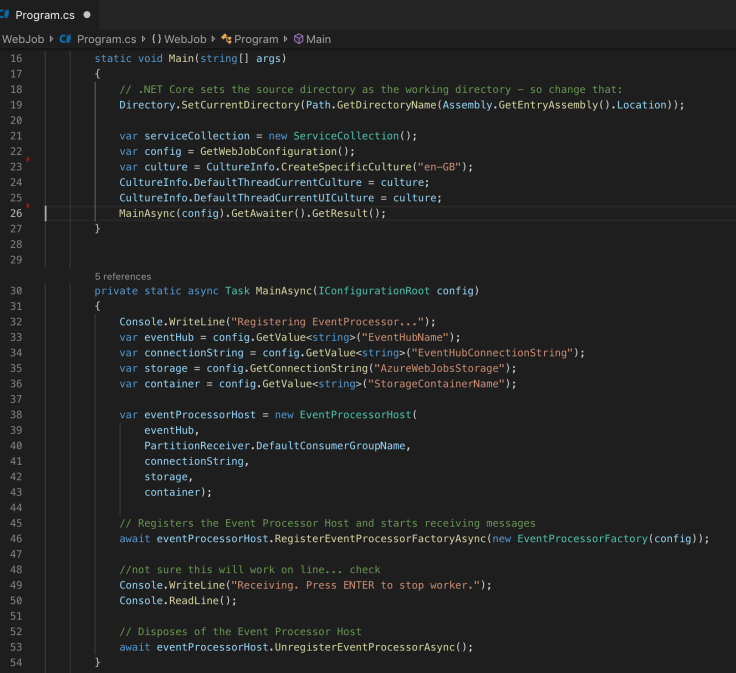
Adding the following code to our program.cs file will mean that when this app starts up, it will
- Get some settings, then kick of our worker method async
- Create an event processor host (a thing that knows about the event hub)
- Pushes an event processor factory into that host (a thing that will pick a processor for our hub … we only have the one processor, so ours just gives us an instance of that one each time)
- An event processor, which will be the thing that actually gets the message and deals with it. This is what ‘runs’ on each partition of the EventHub.
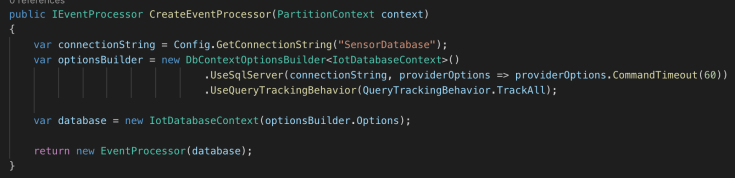
So… to start with, add a file called EventProcessorFactory.cs and fill it out like this.

All this does is new up an EventProcessor (Chill, I’ll add that in a minute) and “attached” it to each partition.
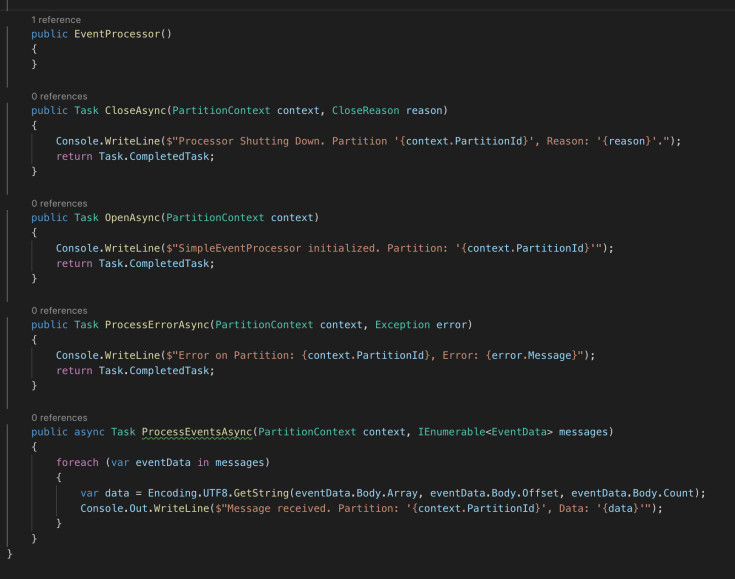
So now add a new class called EventProcessor.cs and stick this stuff in there.
So… this should run fine. Do a wee dotnet restore, then dotnet build, then hit F5 in Visual Studio Code.
Plug in your MXChip, it should be up and running and sending messages in a few seconds, you will see the messages being output in the console window.
The version in the repo is a bit more complex as it has stuff to go to a database in it, but if you are having issues, you can refer to it.
4 – Database Time
Ok, so lets create a database to stick these messages in. I’m on a Mac, so I use Azure Data Studio (You can download it here)

Connect to your database and right-click on your database and hit “New Query” then fire this SQL in there to create the table we are going to use
IF object_id('SensorData', 'U') IS NULL
BEGIN
    CREATE TABLE [dbo].[SensorData]
    (
        [Id] [bigint] IDENTITY(1,1) NOT NULL,
        [Partition] [varchar] (3) NOT NULL,
        [Type] [nvarchar](200) NOT NULL,
        [Value] [nvarchar](200) NOT NULL,
        [Created] [datetime] NOT NULL,
        [Modified] [datetime] NOT NULL,
        CONSTRAINT [PK_SensorData] PRIMARY KEY CLUSTERED
    (
        [id] ASC
    )WITH (PAD_INDEX = OFF, STATISTICS_NORECOMPUTE = OFF, IGNORE_DUP_KEY = OFF, ALLOW_ROW_LOCKS = ON, ALLOW_PAGE_LOCKS = ON) ON [PRIMARY]
    ) ON [PRIMARY]
END
This creates a table for us, Id, Partition (because our Processors run on multiple partitions, we are going to add a field for that… if we didn’t two processors could clash on the same row)
5 – Entity Framework
So I’m skipping over bits and bobs here, but hopefully covering the main bases. EntityFramework is Microsoft’s solution for Database access. It’s a way of translating your strongly typed classes into SQL. I personally like to create my database with SQL and mirror it in code, as opposed to using the entity framework migrations (what is generally referred to as ‘code-first’, doing it the way I do it, is ‘database-first’)
Create a class for our database context ‘IoTDatabaseContext.cs’
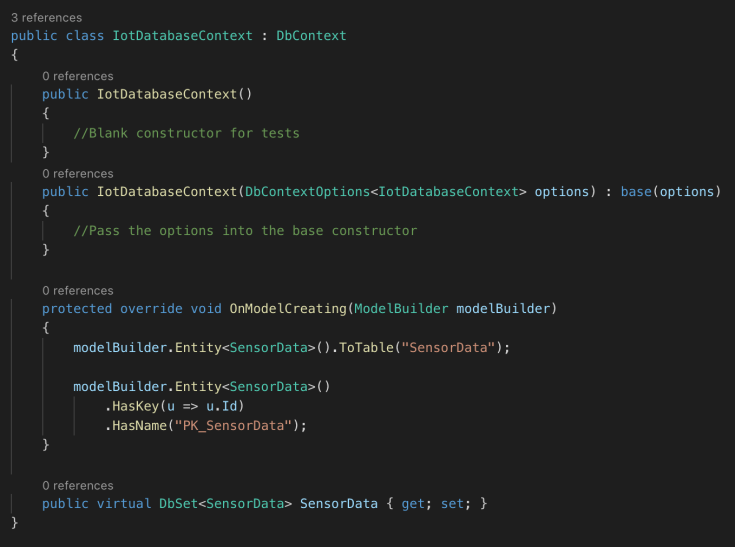
This just ties up an object called SensorData to our table. The SensorData object looks like this:

6 – Processing the data
So we are going to flesh out the EventProcessor by pushing our database context into it
In the processor itself we are going to process the data, if it’s changed we are going to store it in the database… this is just a snipped of the class… you know where to find the rest.
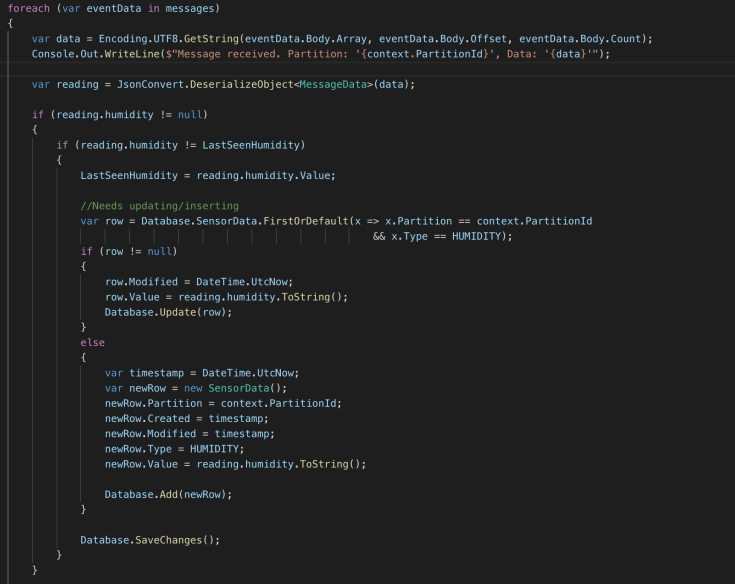
So, what’s going on here is, we are grabbing our message, deserialising it, checking to see if it has data, if it has changed, and if it already exists in our database… if it does, we update it, if not, we add it. We are currently only processing humidity and temperature.
Running this now, you should see two rows in your database which change depending on the conditions of your MXChip.
7 – The Website
This is super simple… create a folder, then navigate to it with terminal then type
dotnet new mvc
… and we are almost done! The easiest way to get this website talking to the database is… copy across your SensorData.cs, IoTDatabaseContext.cs add a “connection strings” section to your appsettings.json in the web and stick the SQL Connection String over from the webjob. It will look something like this
{
    "Logging": {
        "LogLevel": {
            "Default": "Warning"
        }
    },
    "AllowedHosts": "*",
    "ConnectionStrings": {
    "SensorDatabase": "{YOUR_SQL_CONNECTION_STRING}"
    }
}
Now, your IoTContext can grab that connection string and should just work out of the box.
In Startup.cs > ConfigureServices() add the following line so that our database context is included in the built-in dependency injection. So now we can just add it to the constructor for our controller and have it automatically available to us.
services.AddDbContext<IotDatabaseContext>(options => options.UseSqlServer(
Configuration.GetConnectionString("SensorDatabase")));
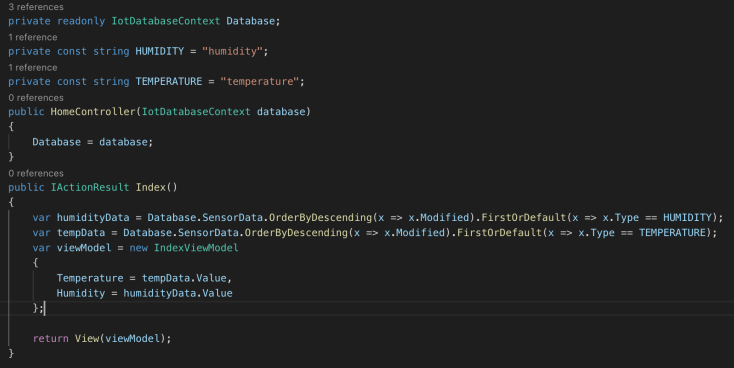
Onto the controller, I have added a class called IndexViewModel which just has two properties for temperature and humidity, I’m just newing up one of those and filling it with the values from the database that our webjob has already populated for us.
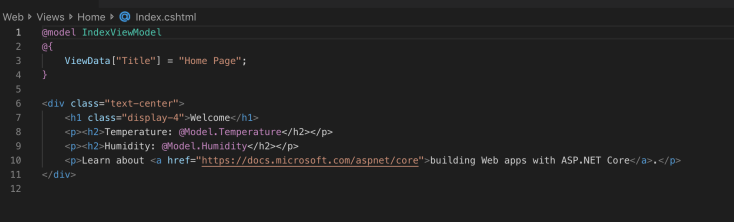
FINALLY … the view itself. Just open up Views > Home > Index.cshtml, in here we are going to tell the view that it’s viewmodel is that IndexViewModel and then output the values to the markup when the page is rendered.
DONE! So… now plug in your chip, run your webjob, run the website… and you should see something like this.

8 – End
So… well done if you are here! I know there was quite a lot to take in there, but the basic version is… our chip is providing data from its sensors, sending it to the IoT Hub in Azure… our webjob is ‘subscribed’ to that and is reading the data, processing it, and saving some information to a database. Our Website is using the same tools and reading from that database and showing us what our sensor is reading on-screen.
You could apply this theory to any of the sensor data on the chip, publish the site/webjob to the cloud and then remotely monitor anything that is being sent… from any number of chips, or other IoT Sensors.

That looks so cool!
LikeLike